VRS X Configuration
- Feed configuration
- Additional data: Aircraft Database
- Additional data: Airport Database.
- Aircraft marker mapping
- VRS X Security: Radar Privacy & User management
- External API Integrations
Feed configuration
Feed Configuration
To start tracking aircraft, you need to connect VRS X to a data source (Feeder).
Step-by-Step Setup
-
Open the Admin Panel.
-
Click on the Feeds tab in the sidebar.
-
Click the + Add Feed button.
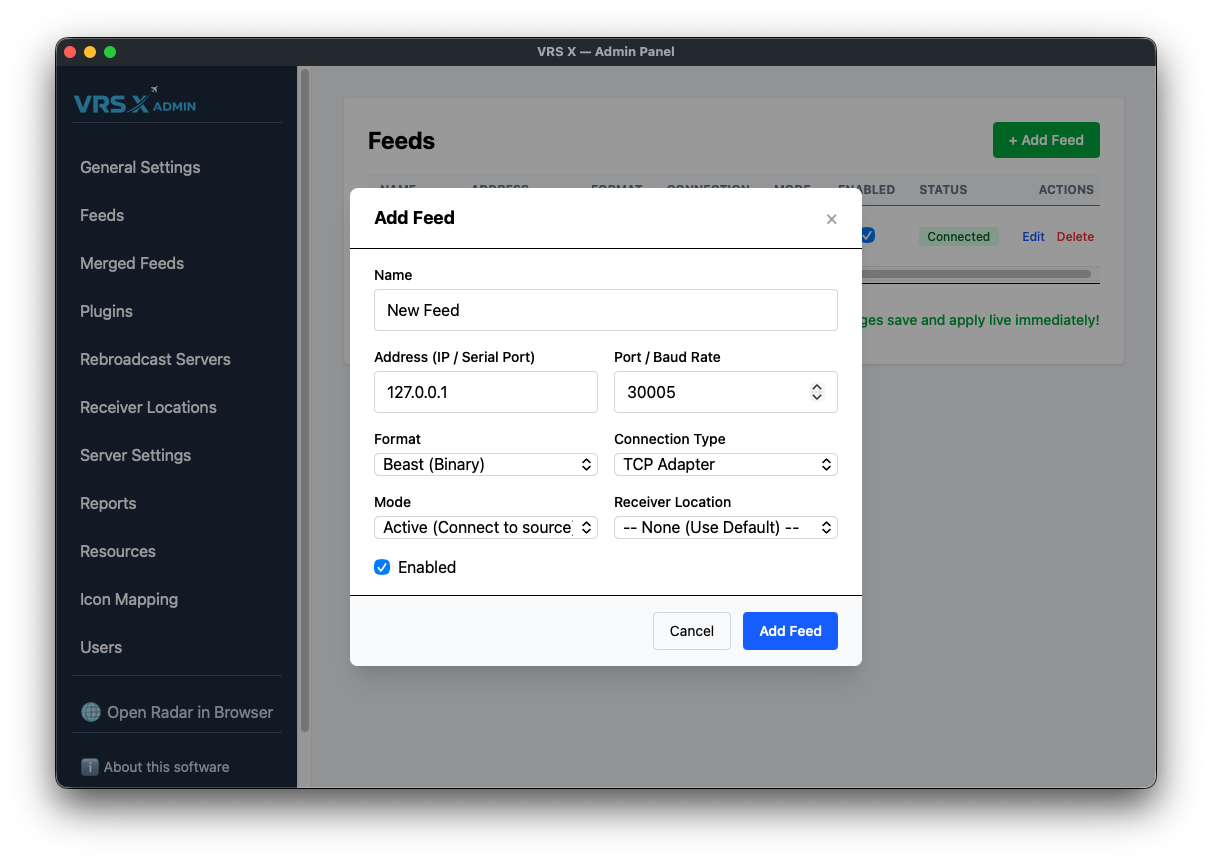
Configuration Fields
Connection Modes
-
Active (Standard): VRS X will initiate the connection to your feeder.
-
Passive (Push): VRS X will open a port and wait for the feeder to push data to it
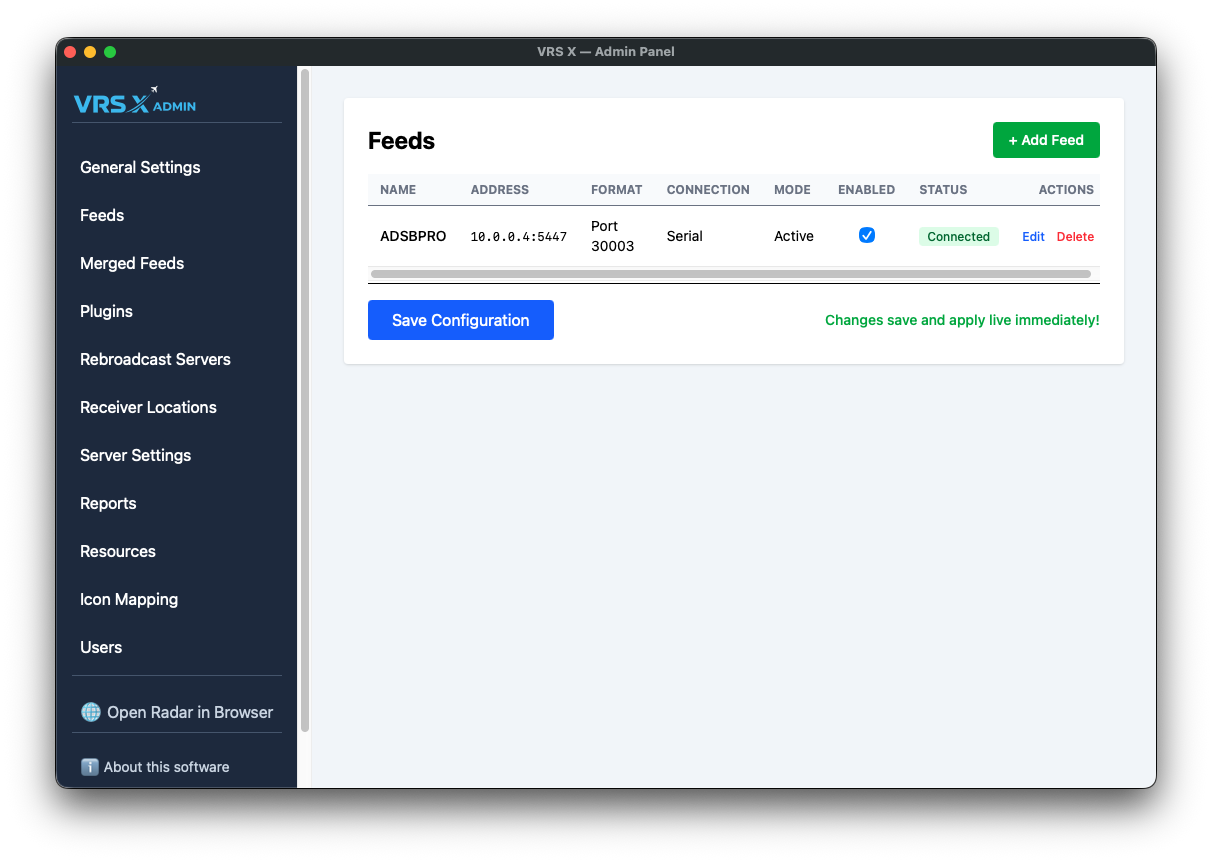
💡 PRO TIP: Once saved, your feed will appear in the list. Check the STATUS column to verify the connection.
⚠️ IMPORTANT NOTE: If you are using Active Mode and the connection fails, the STATUS column will provide a detailed error log. Please note that in Passive Mode, status information is limited since VRS X is just waiting for incoming traffic!
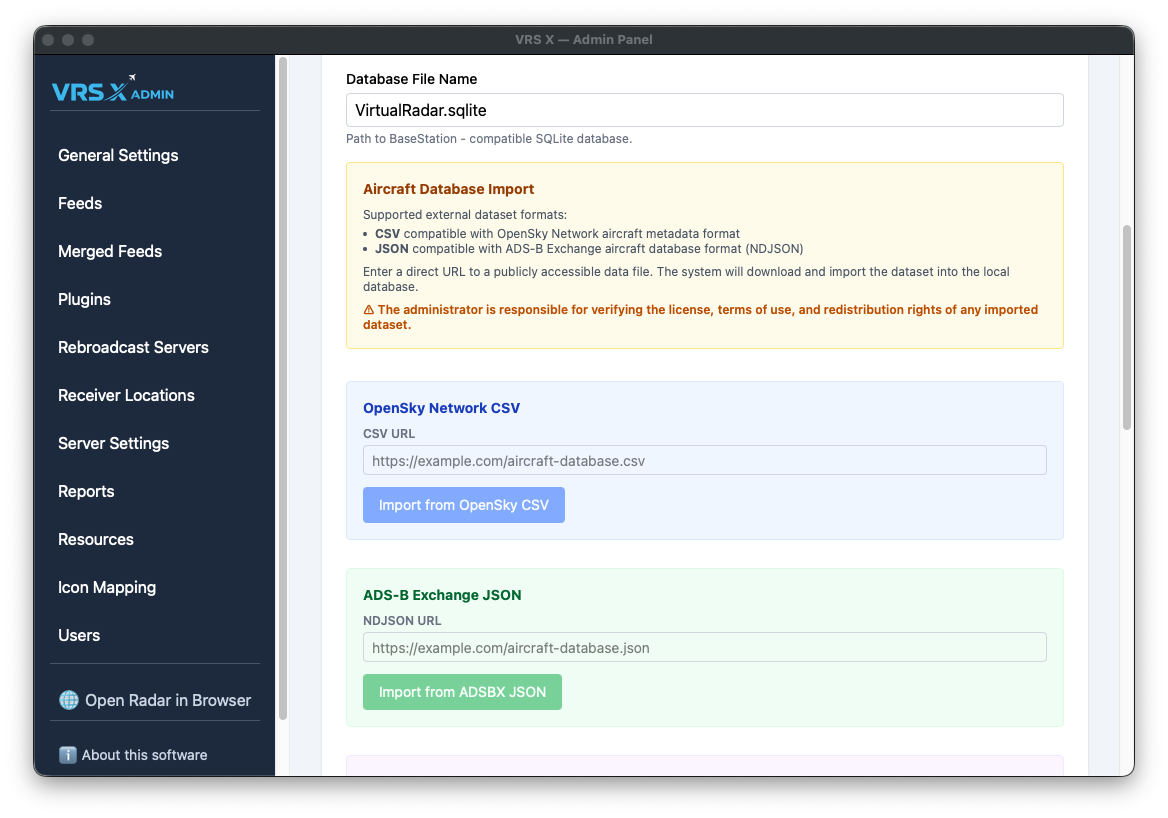
Additional data: Aircraft Database
Data Sources: Aircraft Database
VRS X does not come with a built-in aircraft database. Why? Because I believe your database is the best, and I know how much time you've spent perfecting it.
By using the BYOD (Bring Your Own Data) approach, VRS X acts as a high-performance compatibility layer. You bring the data, and VRS X makes it fly. This also ensures we stay 100% compliant with various data provider licenses.
Supported Formats
How to Import Data
Importing hundreds of thousands of records is optimized to take only a few seconds, depending on your CPU power.
-
Go to the Admin Panel.
-
Select Server Settings from the menu.
-
Scroll down to the BaseStation Database section.
-
Paste the download URL for your chosen data source.
-
Click the corresponding "Import from..." button.
-
Scroll to the bottom and click Save Configuration.
-
Restart VRS X to apply changes.
🛠️ Developer's Note (Visual Bug): > Currently, you might see OpenAIP settings in this section. This is a known visual bug and will be moved to its proper place in the next update.
🚀 Future Roadmap: > In upcoming versions, this entire section will move to a dedicated Resources tab, featuring a built-in Database Editor for direct manipulation of your records.
Additional data: Airport Database.
Data Sources: Airport Database (OurAirports)
To display airports, runways, and metadata on the map, VRS X utilizes the community-driven OurAirports dataset. This allows you to have up-to-date global airport information without bloating the core application.
The Workflow
Just like the Aircraft Database, this follows the BYOD principle. You provide the source, and VRS X handles the heavy lifting of parsing and rendering.
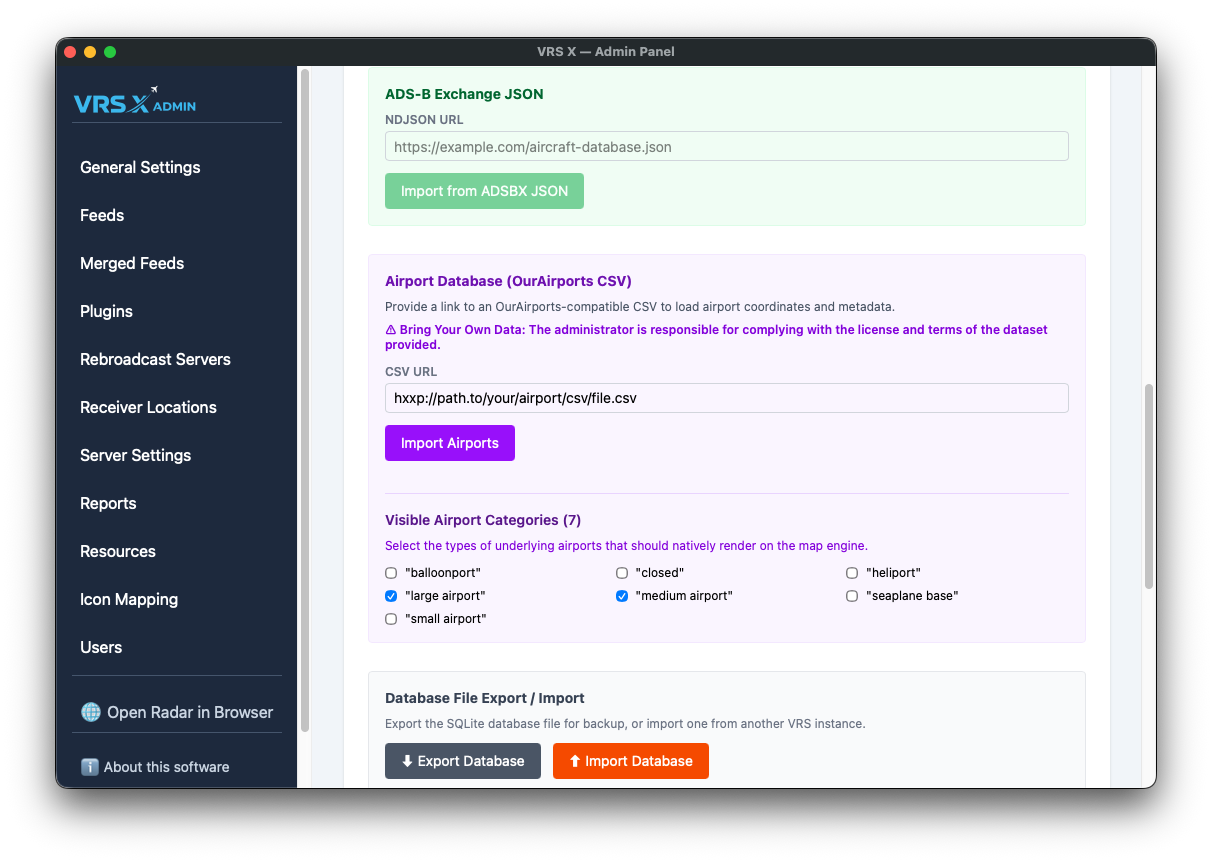
Visible Airport Categories
Not every "airport" is a massive international hub. To keep your map clean and high-performance, you can toggle which categories are natively rendered on the map engine.
Available categories include:
-
Large, Medium, and Small airports
-
Heliports and Seaplane bases
-
Balloonports
-
Closed facilities
💡 Pro-Tip: If your map feels cluttered, try unchecking "small airport" or "closed" to focus only on major hubs.
⚠️ License & Responsibility
Bring Your Own Data: The administrator is responsible for complying with the license and terms of the dataset provided. Ensure you respect the attribution requirements of OurAirports or any other source you decide to use.
Aircraft marker mapping
Aircraft Icon Mapping
While VRS X features an intelligent automatic icon selection based on Weight Turbulence Category (WTC), you can manually override these defaults for specific aircraft. This allows you to assign dedicated silhouettes to your favorite or most common aircraft types.
How it Works
Manual mappings are the highest priority in the rendering engine. If an ICAO code is defined here, its assigned icon will always take priority over WTC-based automatic selection.
Adding a New Mapping
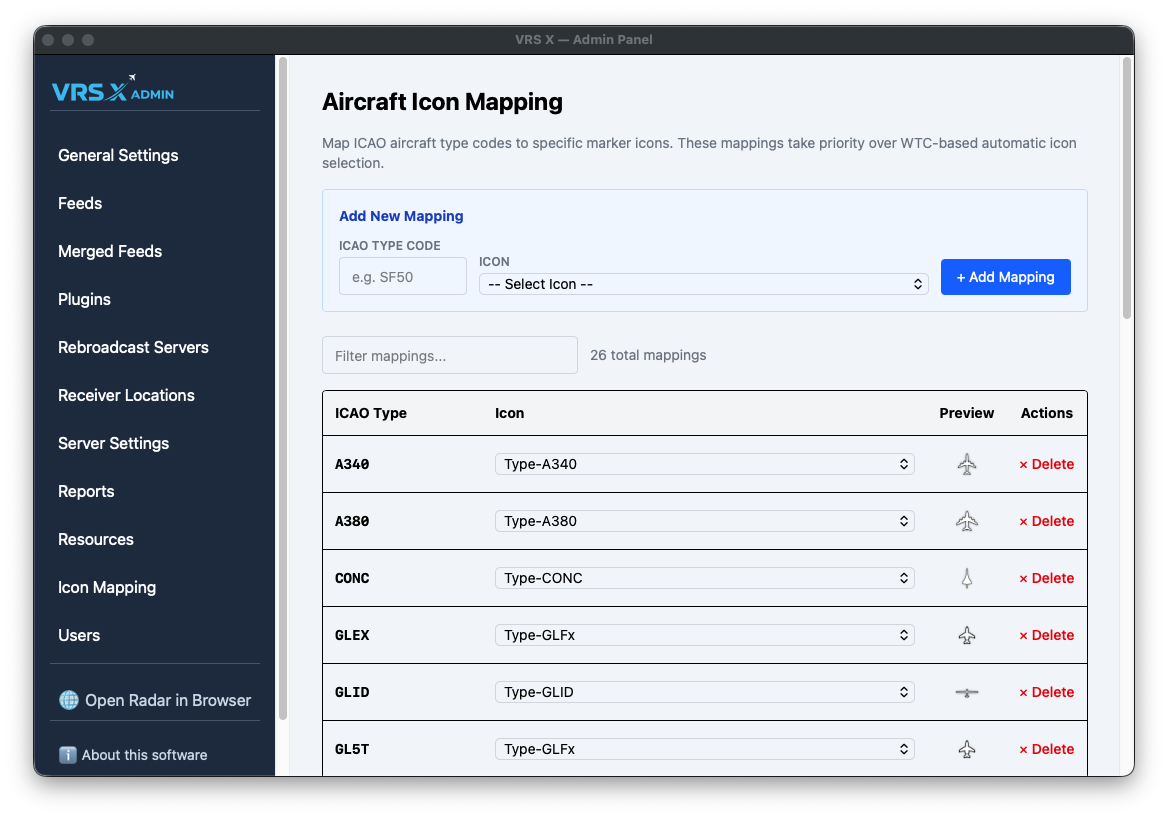
Managing Your Icons
The mapping table provides a clear overview of your custom silhouettes:
-
Filter: Quickly search through your mappings using the filter box (useful when you have dozens of custom icons).
-
Preview: See the actual marker silhouette in the Preview column before it hits the live map.
-
Actions: Easily remove a mapping by clicking × Delete if you want to revert to automatic WTC selection for that type.
VRS X Security: Radar Privacy & User management
User Management & Access Control
This section handles the security of your VRS X instance, allowing you to control who can view your radar data and who can modify server configurations.
Radar Visibility
The Web Server settings defines the global reach of your radar map. You can find it under Server Settings option:
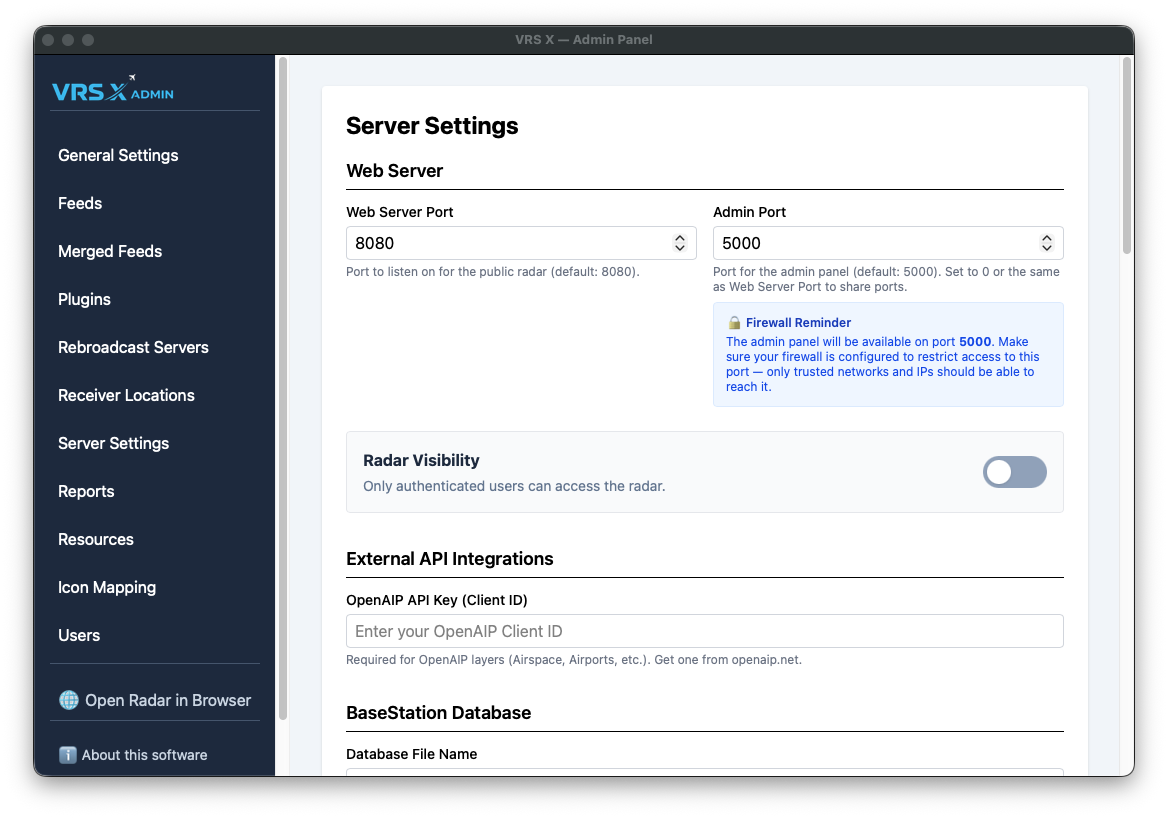
- Web server port: Port number on which radar will be accessible
- Admin port: WiP: Port number for Admin Panel - Admin port can be the same as Web Server Port, but mind the security
-
RADAR VISIBILTY: defines if radar is private or public. If Radar Visibility is OFF, user login is required. If its ON, everyone can see the radar.
User Management (IAM)
VRS X includes a basic Identity and Access Management (IAM) system. This allows an administrator to create dedicated accounts for other users or additional admins.
You can find this panel under Users in the sidebar.
Roles and Privileges
Administrator Actions
Administrators have the power to manage the user lifecycle at any time:
-
Toggle Role: Instantly change a user's privileges between "User" and "Admin".
-
Reset PW: Reset a user's password if they lose access.
-
Delete: Permanently revoke access by deleting the account.
Creating New Users
Only an existing Admin can create new accounts.
-
Enter a Username (minimum 3 characters).
-
Assign a Temporary Password (minimum 6 characters).
-
Select the Role and click Create User.
💡 First Login Policy: To ensure account security, any new user must change their password upon their first login. If a user has not yet completed this step, their status will be displayed as "Must change password" in the management table.
External API Integrations
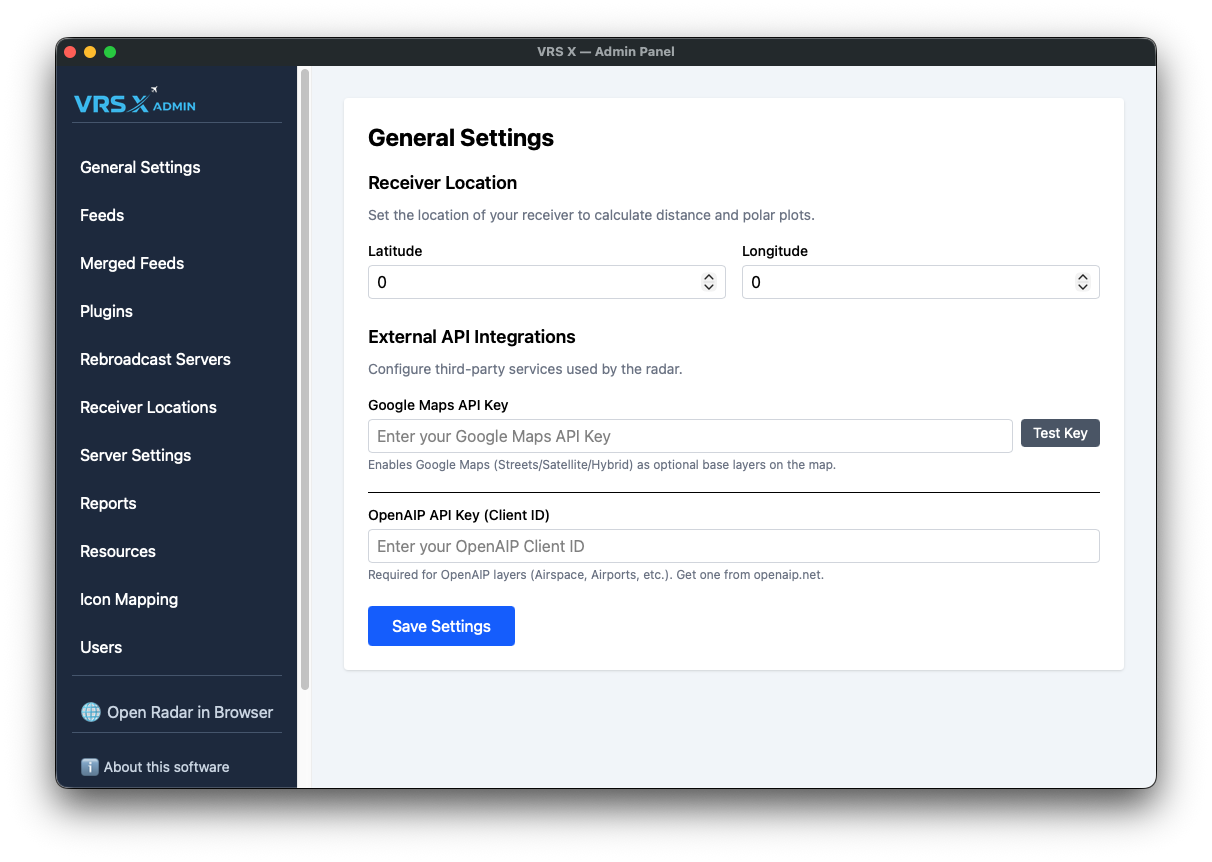
External API Integrations: Google Maps & OpenAIP
To enhance your radar experience with professional-grade base layers and aeronautical data, VRS X supports integration with third-party providers. These configurations are located in the General Settings panel.
1. Google Maps Integration
Adding a Google Maps API key unlocks premium base layers, including Streets, Satellite, and Hybrid views.
- Setup: Enter your unique key into the Google Maps API Key field.
- Verification: Click the Test Key button to instantly verify if your API key is valid and active.
- Result: Upon a successful test and save, the radar map will display additional Google Maps base layer options.
2. OpenAIP Integration
OpenAIP provides critical aeronautical layers, such as global airspaces and specialized airport data.
- Setup: Enter your Client ID (obtained from openaip.net) into the OpenAIP API Key (Client ID) field.
- Validation: Note that unlike Google Maps, there is no manual "Test" button for OpenAIP; the key is validated when the map engine requests data layers.
- Result: Once configured, OpenAIP layers like Airspace and specialized Airports will be available for rendering.
💾 Saving Your Configuration
To apply any changes made to External API Integrations:
- Ensure your keys are correctly pasted.
- Scroll to the bottom of the General Settings page.
- Click the Save Settings button to persist your changes to the server.